Last Updated: October 20, 2016

Things every android developer should know - part 3

Description: In this post I'm gonna demonstrate some useful tips which we could come handy in our app development life cycle

Also check out Part 1 and Part 2.

So let 's get started.


1. Grant all permissions at once in Marshmallow and above.  

As we know marshmallow compatible apps require permissions. So we normally show permission dialog to the user asking to grant us. That's fine. But every time clicking that 'allow' feels annoying for developers.

So the idea is to allow all the permissions at once without every time clicking the allow button.

Below  shell script will help to make it happen flawlessly.
#!/bin/sh

#add your package_name
PACKAGE=com.app.code2concept

#create array with all the permission you need to enabled    
PKG_ARRAY='android.permission.CALL_PHONE
        android.permission.GET_ACCOUNTS
        android.permission.READ_SMS
        android.permission.READ_CONTACTS
        android.permission.ACCESS_FINE_LOCATION
        android.permission.CAMERA
        android.permission.WRITE_EXTERNAL_STORAGE'

#lets exceute our command
for permissions in $PKG_ARRAY; 
do
 echo $permissions + ' granted'
 adb shell pm grant $PACKAGE $permissions
done

echo 'Bingo its done'
OUTPUT:
$ sh grant_all_permissions.sh
android.permission.CALL_PHONE +  granted
android.permission.GET_ACCOUNTS +  granted
android.permission.READ_SMS +  granted
android.permission.READ_CONTACTS +  granted
android.permission.ACCESS_FINE_LOCATION +  granted
android.permission.CAMERA +  granted
android.permission.WRITE_EXTERNAL_STORAGE +  granted
Bingo its done'

Before


After


2. Battery Historian

Battery historian translate the battery stats into visualization form thereby helping us to figure out whats the cause and how we can optimized our battery usage.

Pre-requisite:
1. 'adb' is configured
2. Devices is detectable using 'adb devices' command
3. Python(2.7)  is install and path is set.

Step 1: Reset the battery stats to fetch fresh info using below
adb shell dumpsys batterystats --reset

Note: Disconnect phone and explore the app for few minutes and connect again

Step 2: Capture 'batterystats' using below command
adb shell dumpsys batterystats > batterystats.txt

Note: The command creates a file name 'batterystats.txt' into the current directory

Step 3: Clone or download the Github repo of 'Battery Historian' from Here. You will find a python script at path '../battery-historian/scripts/historian.py'

Note: You can keep both 'historian.py' and 'batterystats.txt' in the same folder for ease

Step 4: Finally let execute the python script against our 'batterstats.txt' as input as show below
python historian.py batterystats.txt > batterystats.html
This will create 'battertstats.html' fig.1 which we can use to analyse the battery usage as shown HERE.

Historian
fig.1

Last Updated: July 30, 2016

Android Data binding

Description: In this post I'm gonna illustrate concept of 'Data Binding' in android. So straight away.

Let's get started.


'DataBinding' in android was introduced as an effort to coupled the model i.e data directly into the view, thereby eliminating findViewById()  at much larger extend. Although its not limited to this and can help to remove lots of boilerplate code thereby. Its the direct roadway to implement MVVM pattern in our apps.

Prerequisite:

1. Add below snippets into your 'Modulebuild.gradle within 'android' section
    dataBinding {
        enabled true
       }

2. Now just add below line within the your 'Project'  build.gradle within 'dependencies' section.
Note: The gradle plugin should be greater or equals v1.5 +
 classpath 'com.android.tools.build:gradle:1.5.0 

Let's start with simple example of how to eliminate findViewById in activity.

1. Eliminate findViewById();

Step 1: Simply create a model with a field name as 'title' and also the POJO for the same.

public class SingleModel {

    private String title;

    public SingleModel() {
    }

    public String getTitle() {
        return title;
    }

    public void setTitle(String title) {
        this.title = title;
    }
}

Step 2: In our activity_main.xml wrap your parent layout within '<layout> ...< /layout>' . As shown below. Create a <data> ...</data> tag with <variable>...</variable> to access its model variables

   <layout xmlns:android="http://schemas.android.com/apk/res/android">

    <data>
        <variable
            name="single"
            type="com.code2concept.databinding.models.SingleModel"/>
    </data>

    <RelativeLayout
        android:layout_width="match_parent"
        android:layout_height="match_parent">

        <TextView
            android:layout_width="wrap_content"
            android:layout_height="wrap_content"
            android:layout_centerInParent="true"
            android:text="@{single.getTitle()}"/>
    </RelativeLayout>
</layout>

Note: 1. Once you have created a variable into <layout> apt builds the binding file name BR.java(similar concept what R.java doeswhich and other binding functions.

Step 3: Lets integrate in our MainActivity. 

public class MainActivity extends AppCompatActivity {

    @Override
    protected void onCreate(Bundle savedInstanceState) {
        super.onCreate(savedInstanceState);
        ActivityMainBinding mainActivity = DataBindingUtil.setContentView(this, R.layout.activity_main);

        SingleModel singleModel = new SingleModel();
        singleModel.setTitle("Wow ! Data binding is awesome");
        mainActivity.setVariable(BR.single, singleModel);

    }
}

Bingo ! we have integrated databinding in our app


2. Handle click.

Step 1: Create a <variable> ... </variable> tag with name and type as shown below.

Note: Type can be created from separate class as well. We're gonna implement onClick in Activity.

<layout xmlns:android="http://schemas.android.com/apk/res/android">
    <data>
        <variable
            name="single"
            type="com.code2concept.databinding.models.SingleModel"/>

        <variable
            name="singleClick"
            type="com.code2concept.databinding.MainActivity"/>

    <RelativeLayout
        android:layout_width="match_parent"
        android:layout_height="match_parent">
        <TextView
            android:layout_width="wrap_content"
            android:layout_height="wrap_content"
            android:layout_centerInParent="true"
            android:onClick="@{singleClick.onClick}"
            android:text="@{single.getTitle()}"/>
    </RelativeLayout>
</layout>


Step 2: Finally bind the singleClick to the activity as shown below.
public class MainActivity extends AppCompatActivity implements View.OnClickListener {

    @Override
    protected void onCreate(Bundle savedInstanceState) {
        super.onCreate(savedInstanceState);
        ActivityMainBinding mainActivity = DataBindingUtil.setContentView(this, R.layout.activity_main);

        SingleModel singleModel = new SingleModel();
        singleModel.setTitle("Wow ! Data binding is awesome");
        mainActivity.setVariable(com.code2concept.databinding.BR.single, singleModel);

        //bind click to the  activity
        mainActivity.setSingleClick(this);
    }

    @Override
    public void onClick(View view) {
        Toast.makeText(this, "Single Model view is clicked", Toast.LENGTH_SHORT).show();
    }
}

Great, we have handled onClick event as well

Question: what happens when the content of the view need to be changed in the runtime?.
No need to worry 'DataBinding' helps us effortlessly.


3. NotifyChangeProperty

Step1: Add @Bindable annotation to the getters and notifyPropertyChanged() to the setters as shown below.

public class SingleModel extends BaseObservable {

    private String title;


    @Bindable
    public String getTitle() {
        return title;
    }

    public void setTitle(String title) {
        this.title = title;
        notifyPropertyChanged(BR.title);
    }
}

Step 2: Finally lets change our title on onClick. fig.1

public class MainActivity extends AppCompatActivity implements View.OnClickListener {

    private SingleModel singleModel;
    private ActivityMainBinding mainActivity;

    @Override
    protected void onCreate(Bundle savedInstanceState) {
        super.onCreate(savedInstanceState);
        mainActivity = DataBindingUtil.setContentView(this, R.layout.activity_main);

        singleModel = new SingleModel();
        singleModel.setTitle("Wow ! Data binding is awesome");
        mainActivity.setVariable(BR.singleModel, singleModel);

        //bind click to the  activity
        mainActivity.setSingleClick(this);
    }

    @Override
    public void onClick(View view) {
        singleModel.setTitle("Title is changes successfully");
    }
}

databinding
fig.1

Awesome, finally we have integrated databinding in our project ;-). Part 2 coming soon


Last Updated: April 17, 2016

Things every android developer should know - part 2

Description: In the post, we'll continue the legacy of  Part 1 :-). Below are some tools provided by Google Android which is helpful for Android developers during the development and debugging session of the Production app issues

So let's get started :-)


Note: If you have missed part 1. Please refer here

1. Capture or record screen without any external app.

Often we are required to take snapshots of the app's screen or even record a video to show some features to colleagues QA or Clients. It comes in handy very often.

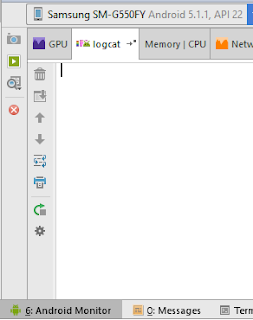
Step 1: Simply connect your device. Open the Android Monitor from Android Studio you'll see as fig.1.
http://code2concept.blogspot.in/
fig.1
Step 2: Now, you can open your app and click on the camera icon from the Android monitor located in the extreme top-left corner to capture any screen you want. Bingo !!!

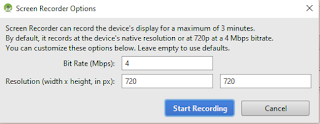
For video: Click the video icon below the camera icon. Enter the resolution with multiples of 16x. fig.2. That's it. It'll start recording your actions on the app.

http://code2concept.blogspot.in/
fig.2


2. How to find layout boundaries?

Layout boundaries are very useful when we develop our UI components. It gives a real sense of layout, thereby letting us study the arrangement of different widgets in the layout.

Step 1: Open Settings - Developer Options - Show layout boundaries. From drawing section

https://www.linkedin.com/in/nitesh-tiwari-b5032a74
fig.3.LinkedIn app

fig.3. A Simple analysis of pencil icon. (without opening our layout)

1. The Edit pencil icon has some padding to it. 
2. It's aligned to the top-right corner of its parent layout.

Really awesome.


3. How to debug obfuscated code using proguard tool?

Note: This tool is inbuild provided by Google Android Sdk for developers and is helpful during debugging for live issues 

As we know, code is obfuscated when we build our app with Proguard enabled. We often come in contact with obfuscated code in our app while debugging the stack trace of the crashes.

So decoding is very much needed to study the stack trace. Android builds a file called "mapping.txt" which serves as the key ingredient to decode, in a combination with "retrace".

In Windows

Step 1: Go to  (android-studio-install-dir-path)\tools\proguard\bin  open "proguardgui.bat"  fig.4

fig.4
Step 2: Click on "ReTrace" fig.5. and upload your "mapping.txt" file from app/build/outputs/mapping/.../mapping.txt   and the obfuscated code file (e.g: crash.txt). You can also simply paste the stack trace in the box provided.

http://code2concept.blogspot.in/
fig.5
You can also use command line code to do that.

\tool\proguard\bin> retrace.bat -verbose   (path_to_mapping.txt)\mapping.txt  (path_to_stacktrace)\crash.txt


For more updates follow us on -  Twitter

#codingIsAnArt
#coderconsole

Last Updated: February 16, 2016

How to create google chrome extension in 3 simple steps?

Description: In this post I'm gonna show you 3 simple steps to create your own google chrome extension.You can simply follow the steps with tips and note listed in between the post.

So lets get started.


Step 1: Create a folder namely('chrome_extension_demo') with 4 files in it index.html, main.js, manifest.json & extension.css.

Step 2: Lets add code into above files.
Tip: you can simply open the folder in any editor like(Sublime or Notepad++ for ease to write code)

  • index.html(contains our basic html code with few buttons on it)

<html>
<head>
 <title>Code2Concept extension demo</title>
 <script src="main.js"></script>
 <link rel="stylesheet" type="text/css" href="extension.css">
</head>
<body background="bg.png">
 <h1 align="center" id="code2concept"><a href=""><font color="white">Code2Concept</font></a></h1>
 <center>
  <div class="buttonContainer">
   <div>
    <button id="home" class="button">Home</button>
    <br/>
    <br/>
   </div>
   <div >
    <button id="twitter" class="button">Twitter</button>
    <br/>
    <br/>
   </div>
   <div>
    <button id="my_linkedin" class="button">My LinkedIn</button>
    <br/>
    <br/>
   </div>
   <div>
    <button id="stackoverflow" class="button">Stackoverflow</button>
    <br/>
   </div>
  </div>
  <hr/>
  <h5> <font color="white">This is the demo to create google chrome extension.</font></h5>
 </center>
</body>
</html>


  • manifest.json(simple json file which is needed by chrome to add extension)
{
  "manifest_version": 2,

  "name": "Code2Concept extension demo",
  "description": "This is the Code2Concept extension to demostrate chrome extension",
  "version": "1.0",

  "background":{
  "scripts": ["main.js"]
  },
  
  "browser_action": {
   "default_icon": "icon.png",
   "default_popup": "index.html"
  },
  "permissions": [
   "activeTab"
   ]
}

  • main.js(javascript code to add listener to our buttons)
document.addEventListener('DOMContentLoaded', function() {

 //home
  var home = document.getElementById('home');
  home.addEventListener('click', function() { 
    openUrl('http://bit.ly/1LqS9ku');
  }, false);

   //twitter
  var twitter = document.getElementById('twitter');
  twitter.addEventListener('click', function(){
    openUrl('http://bit.ly/20XuV1K');
  }, false)

  //stackoverflow.
  var stackoverflow = document.getElementById('stackoverflow');
  stackoverflow.addEventListener('click', function(){
   openUrl('http://bit.ly/1olt4D5');
  }, false)

//my linkedIn public dir.
  var my_linkedin = document.getElementById('my_linkedin');
  my_linkedin.addEventListener('click', function(){
   openUrl('http://bit.ly/1Tn6BBJ');
  }, false)


  //open url function in new tab
  function openUrl(newURL) {
    chrome.tabs.create({ url: newURL});
  }

}, false);


  • extension.css(css for buttons)
.button {
 border: 1px solid #13cbbb;
    border-radius: 3px;
    color: #FFFFFF;
    display: inline-block;
    float: center;
    font-size: 12px;
    margin-right: 3.2%;
    background-color: #13cbbb;
    padding: 7px 4.0%;
    width: 100px;
    min-width: 100px;
    max-width: 100px;
}
.button:hover {
 background-color:#13cbbb;
 opacity: 0.7;
}
.button:active {
 position:relative;
 top:1px;
}

.buttonContainer{
    width: 160px;
}

Note: You can download bg.png from here  and  icon.png  from here and place in the folder created in step 1:


Step 3: The most important step is how to add our code in chrome browser. Open chrome settings from hamburger icon on the right of  browser. Settings --> extensions --> load unpacked extension(select your folder created instep 1) --> fig.1


Chrome extension code2concept

Finally you'll see the your extension add to the chrome as shown in fig.2.
Chrome extension
fig.2

  • If you find some issue implementing simply download and follow step 3.

  • To upload on chrome web store go here since we have developed this into developer mode.

Bingo!!! you have created your first chrome extension successfully.

Last Updated: February 09, 2016

Things every android developer should know - part 1


Description: In this post, I'm gonna demonstrate tools that help solve some common problems while app development & help increase the speed as well.

So let's get started :-)


1. How to run app on phone without USB cord.(need USB initially to make connection

Note: Android Studio has provided a more sophisticated option to connect without USP using wireless debugging. Do check out the blog


Step 1: Connect the device with the cord to your system. Ensure that USB debugging is enabled from Developer options. Open cmd(windows) or Terminal(Linux) run the command. You'll find the connected device.
adb kill-server && adb devices
Step 2: Run the next command to restart in tcp mode on port 5555
adb tcpip 5555
Step 3: Now disconnect your device from the system and note down your ip address of the phone from Setting > About Phone > Status

E.g It could be something like 192.168.0.3(IP address) Now run the final command by replacing it with your IP address
adb connect 192.168.0.3:5555
Bingo we're done now your device is connected and you can run it wirelessly :-)

2. How to find SHA1 key from android studio?

SHA1 key is needed in many different apps containing maps or social sites authentication or using any Google apps and services. It's super useful. So the simplest way to get that is using Android Studio.

Step 1: Select the Gradle projects from the right pane and expand Tasks > Android> signingReport. (fig.1).

Note: If you do not find your project in Gradle Projects sync the project from Android Studio.

Gradle Project
fig.1


3. Best way to create icons for android app using vector asset.

Many times in our development we need icons for small things with varied colors or shape. Using Vector Asset in Android Studio we can create our icons with super ease.

Step 1: Right-click on app > New > Vector Asset you'll see Fig. 3. You can choose Material Icons which contains a whole lot of icons in different categories. This will create <vector> for the icon you have selected. (fig.4) in drawable folder

Vector Asset
fig.3
Vector Asset for the icon
Vector xml

fig.4
Step 2: Awesome now just we can simply set it to background or src of ImageView and other widgets.


For more updates follow us on -  Twitter

#codingIsAnArt
#coderconsole

Last Updated: January 12, 2016

How to schedule script in windows Vista 7,8 or 10 ?

Description: In this post I'm gonna show how we can schedule a script using windows task scheduler for Windows vista, 7 ,8 or 10 ?


So lets get started:


Step 1: Create a file with .vbs extension with below line of code in it.

window = msgbox("Code2Concept demo for script scheduling", 39, "Info")

This is to display our message box when our trigger get fired as per our schedule


Step 2: Open Task Scheduler (fig.1) by searching in windows search or from control panel
fig.1


Step 3: Create new Task (fig.2)with name and description.

fig.2


Step 4: Lets browse and add our script created in Step 1:  from Action tab. Also add Triggers as time to schedule the script to run. (fig.3 & fig.4 respectively).

fig.4


fig.5

Output:

Bingo !!! We are done. You can now view your dialog at specific schedule interval


Last Updated: December 19, 2015

Android Studio Flavors Demo

Description: In this post I'm gonna explain and show you guys how to use flavors in android studio.

Android Studio's flavors help as totally avoid chaos in code by separating our release code setup and staging code setup or by creating free/premium version for the same code base.

Really awesome :-)

Lets get started by creating two flavors for our project i.e prod and stag and find how it actually works!!!

Here we goo.


Step 1: Add productFlavors in your  app's build.gradle  within android section.

productFlavors{
    prodFlavors{

    }

    stageFlavors{

    }
}

*Just sync the gradle or rebuild the project you will find variants for two flavors in "Build Variants"(fig.1)


                                      (fig.1)


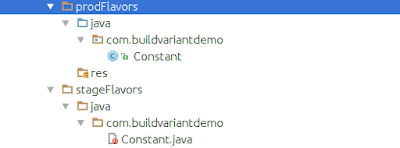
Step 2: Now let's create the folder structure for flavors to use prod and stage flavors similar to the structure of the main.


(Here we have created the folder structure same as the main i.e containing java and res folders respectively)
(fig.2)


Step 3: Lets add a constant file containing our dummy values.Thus we can easily switch the build variant & our constants values get changed as per the build variant selected.

Note: Always change the "Build Variant" when ever you want to change any thing within the flavors code base. (as shown in fig.1)


                                   (fig.3)

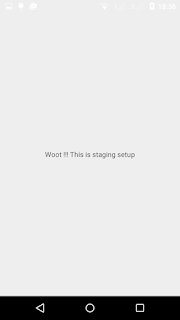
Step 4: Bingo !!!Final code and output.

In production flavor:

public class Constant {
    public static final String FLAVOUR_ID = "Woot !!! This is production setup";
}


In staging flavor
public class Constant {
    public static final String FLAVOUR_ID = "Woot !!! This is staging setup";
}


MainActivity:

public class MainActivity extends AppCompatActivity {

    @Override    protected void onCreate(Bundle savedInstanceState) {
        super.onCreate(savedInstanceState);
        setContentView(R.layout.activity_main);

        //This is where by just changing by build variant we can change our setup easily
        TextView flavourType = (TextView)findViewById(R.id.flavourType);
        flavourType.setText(Constant.FLAVOUR_ID);

    }
}

How to change configuration of the build as per the variant? - (listed below)

productFlavors{

    prodFlavors{
        applicationId "com.buildvariant.prod"
        minSdkVersion 10
        targetSdkVersion 23
        versionCode 2
        versionName "1.1"
 
}

    stageFlavors{
        applicationId "com.buildvariant.stage"
        minSdkVersion 10
        targetSdkVersion 23
        versionCode 2
        versionName "1.1"
    }
}

Thus we can change our project setup thereby avoiding unnecessary chaos by separating our production setup code against staging.

Awesome!!!Android.

Output:


Last Updated: October 21, 2015

Android support v7 palette demo

Description: In this post I'm gonna show you how to use android's support library v7 palette for extracting color from bitmap. Its can have variety of use-cases like making the background of the profile image somewhat similar to profile image or changing the whole UI as per the bitmap into the screen. Really Awesome !!!

Github project here

Lets get started.


Step 1: Add this into build.gradle.

compile 'com.android.support:palette-v7:+'


Step 2: Pass the bitmap into palette to get List<Palette.Swatch> as shown below.

Palette.from(bitmap).generate(new Palette.PaletteAsyncListener() {
    @Override    public void onGenerated(Palette palette) {
        swatchesList = palette.getSwatches();

        }
    }
});


Step 3: Here we have used CountDownTimer to display the RGB of the bitmap into the background of parent layout after the interval of 1sec. As shown below

mainContainer.setBackground(AppUtils.createGradient(swatch.getRgb()));


Steps 4: Lets combine everything :-)


public class MainActivity extends AppCompatActivity implements INotifyTimer {

    private static final String TAG = MainActivity.class.getName();

    private List<Palette.Swatch> swatchesList;
    private CountDownTimerPalette countDownTimer;

    private int size ;

    private RelativeLayout mainContainer;
    private ImageView circularImageView;

    @Override    protected void onCreate(Bundle savedInstanceState) {
        requestWindowFeature(Window.FEATURE_NO_TITLE);
        super.onCreate(savedInstanceState);
        setContentView(R.layout.activity_main);

        init();

        extractColorFromBitmap();
    }

    private void init() {
        mainContainer = (RelativeLayout)findViewById(R.id.mainContainer);
        circularImageView = (ImageView)findViewById(R.id.circularImageView);
    }

    private void extractColorFromBitmap() {

        Bitmap bitmap = AppUtils.getCircleBitmap(BitmapFactory.decodeResource(MainActivity.this.getResources(), R.mipmap.capture_palette));
        circularImageView.setImageBitmap(bitmap);

        Palette.from(bitmap).generate(new Palette.PaletteAsyncListener() {
            @Override            public void onGenerated(Palette palette) {
                swatchesList = palette.getSwatches();

                if (swatchesList != null && swatchesList.size() > 0) {
                    countDownTimer = new CountDownTimerPalette(1000 * swatchesList.size(), 1000, MainActivity.this);
                    countDownTimer.start();
                }
            }
        });
    }

    @Override    public void onTick(int tick) {

        Palette.Swatch swatch = swatchesList.get(tick - 1);
        if (Build.VERSION.SDK_INT >= Build.VERSION_CODES.JELLY_BEAN) {
            mainContainer.setBackground(AppUtils.createGradient(swatch.getRgb()));
        }else {
            mainContainer.setBackgroundDrawable(AppUtils.createGradient(swatch.getRgb()));
        }

    }

    @Override    public void onFinish() {
        countDownTimer.start();
    }


    @Override    protected void onDestroy() {
        super.onDestroy();

        if (countDownTimer != null){
            countDownTimer.cancel();
        }
    }

}


Output:


Last Updated: October 14, 2015

Android Multiple row layout using RecyclerView

Description: In this post I'm gonna show you how we can have multiple row layout in Android's Material Design  RecyclerView  using   getItemViewType.

compile 'com.android.support:cardview-v7:23.0.0'
compile 'com.android.support:recyclerview-v7:23.0.0'

GitHub Project HERE

So lets get started :-)


Step 1:
Create Recycler Adapter by overriding getItemViewType method and giving the type for different layout as shown below.


@Override

public int getItemViewType(int position) {

    MultipleRowModel multipleRowModel = multipleRowModelList.get(position);

    if (multipleRowModel != null)
        return multipleRowMod.type;

    return super.getItemViewType(position);
}
Step 2: Create a viewHolder as per viewType .  We can create different row layout using viewType .

Note: viewType in onCreateviewholder is retured from getItemViewType in Step 1.
@Override
public MultipleRowViewHolder onCreateViewHolder(ViewGroup parent, int viewType) {

    View view = null;

    if (viewType == AppConstant.FIRST_ROW)
        view = inflater.inflate(R.layout.view_row_first, parent, false);
    else if (viewType == AppConstant.OTHER_ROW)
        view = inflater.inflate(R.layout.view_row_other, parent, false);

    return new MultipleRowViewHolder(view, viewType);
}

Step 3: Lets integrated all this in one RecyclerView adapter.

public class MultipleRowAdapter extends RecyclerView.Adapter<MultipleRowViewHolder> {

    private LayoutInflater inflater = null;
    private List<MultipleRowModel> multipleRowModelList;

    public MultipleRowAdapter(Context context, List<MultipleRowModel> multipleRowModelList){
        this.multipleRowModelList = multipleRowModelList;
        inflater = LayoutInflater.from(context);
    }

    @Override
    public MultipleRowViewHolder onCreateViewHolder(ViewGroup parent, int viewType) {

        View view = null;

        if (viewType == AppConstant.FIRST_ROW)
            view = inflater.inflate(R.layout.view_row_first, parent, false);
        else if (viewType == AppConstant.OTHER_ROW)
            view = inflater.inflate(R.layout.view_row_other, parent, false);

        return new MultipleRowViewHolder(view, viewType);
    }

    @Override
    public void onBindViewHolder(MultipleRowViewHolder holder, int position) {
        holder.multipleContent.setText(multipleRowModelList.get(position).modelContent);
    }

    @Override
    public int getItemCount() {
        return (multipleRowModelList!= null && multipleRowModelList.size() > 0 ) ? multipleRowModelList.size() : 0;
    }

    @Override
    public int getItemViewType(int position) {

        MultipleRowModel multipleRowModel = multipleRowModelList.get(position);

        if (multipleRowModel != null)
            return multipleRowModel.type;

        return super.getItemViewType(position);
    }

}


Step 4: Finally our MainActivity looks something like this.

public class MainActivity extends AppCompatActivity {

    private RecyclerView multipleRowRecyclerView;
    private MultipleRowAdapter multipleRowAdapter;

    private List<MultipleRowModel> multipleRowModelList = new ArrayList<>();

    @Override

    protected void onCreate(Bundle savedInstanceState) {
        super.onCreate(savedInstanceState);
        setContentView(R.layout.activity_main);

        multipleRowRecyclerView = (RecyclerView)findViewById(R.id.multipleRowRecyclerView);
        multipleRowRecyclerView.setHasFixedSize(true);

        LinearLayoutManager linearLayoutManager = new LinearLayoutManager(this, OrientationHelper.VERTICAL, false);
        multipleRowRecyclerView.setLayoutManager(linearLayoutManager);
        multipleRowRecyclerView.setItemAnimator(new DefaultItemAnimator());

        fillAdapter();

        multipleRowAdapter = new MultipleRowAdapter(MainActivity.this, multipleRowModelList);

        multipleRowRecyclerView.setAdapter(multipleRowAdapter);
    }

    private void fillAdapter() {

        int type;

        String content;

        for (int i = 0; i < 10; i++) {

            if (i == 0 || i == 5 || i == 9) {
                type = AppConstant.FIRST_ROW;
                content = "Type 1: This is Multiple row layout";
            } else {
                type = AppConstant.OTHER_ROW;
                content = "Type 2";
            }

            multipleRowModelList.add(new MultipleRowModel(type , content));
        }
    }
}


GitHub Project HERE

Sample Output :


Last Updated: August 30, 2015

Android percent support lib sample

Update: 

From API Level 26, percent support library is deprecated. Please use updated code and samples from Github project.

GitHub project HERE

In this post I'm gonna show you guys a demo of percent layout of android from support library. Since many a time in our awesome RelativeLayout we insert LinearLayout just to get the property of layout_weight for accessing.

Now android has a new support library to remove this dependencies.

Before beginning some pre-requestic (at the time for development):

  • Android SDK v22
  • Android Build Tools v22.0.1
  • Android Percent Support Repository v23.0.0
  • Android Support appcompat-v7:22.2.1
So let's get started:


Step 1: Add below line into apps build.gradle.

compile 'com.android.support:percent:23.0.0'

Step 2:  Add any one of below as the parent of the layout.Its similar to our RelativeLayout or FrameLayout.

<android.support.percent.PercentRelativeLayout> 
or
<android.support.percent.PercentFrameLayout>

Step 3: Now we gonna use layout_heightPercent and layout_widthPercent  property's to specify our height and width in percentage.

Consider this simple layout.

percent_layout.xml


Lets make it :-)


<android.support.percent.PercentRelativeLayout
    xmlns:android="http://schemas.android.com/apk/res/android"
    xmlns:app="http://schemas.android.com/apk/res-auto"
    android:layout_width="match_parent"
    android:layout_height="match_parent">
    <TextView
        android:id="@+id/fifty_fifty_tv"
        android:layout_width="0dp"
        android:layout_height="0dp"
        android:layout_gravity="center_horizontal"
        android:background="#ffff8800"
        android:text="50% - 50%"
        android:textColor="@android:color/white"
        android:textSize="25sp"
        app:layout_heightPercent="50%"
        app:layout_widthPercent="50%"
         />
    <TextView
        android:id="@+id/twenty_fifty_tv"
        android:layout_width="0dp"
        android:layout_height="0dp"
        android:layout_gravity="center_horizontal"
        android:layout_toRightOf="@id/fifty_fifty_tv"
        android:background="#ffff5566"
        android:text="20%-50%"
        android:textSize="25sp"
        app:layout_heightPercent="20%"
        app:layout_widthPercent="50%"
        />

    <TextView
        android:id="@+id/thirty_fifty_tv"
        android:layout_width="0dp"
        android:layout_height="0dp"
        android:layout_below="@id/twenty_fifty_tv"
        android:layout_gravity="center_horizontal"
        android:layout_toRightOf="@id/fifty_fifty_tv"
        android:background="#aa3628cc"
        android:text="30%-50%"
        android:textSize="25sp"
        app:layout_heightPercent="30%"
        app:layout_widthPercent="50%"
        />
    <TextView
        android:id="@+id/century_50_tv"
        android:layout_width="0dp"
        android:layout_height="0dp"
        android:layout_below="@id/fifty_fifty_tv"
        android:layout_gravity="center_horizontal"
        android:background="#aacacc46"
        android:text="50%-100%"
        android:textSize="25sp"
        app:layout_heightPercent="50%"
        app:layout_widthPercent="100%"
        />
</android.support.percent.PercentRelativeLayout>


Thus by using the android percent support library we have made our layout simple by removing boilerplate layout.

GitHub project HERE

Really awesome :-)

Last Updated: July 28, 2015

Android InstrumentationTestCase for Network call Demo.

Description: In this post I'm gonna show you how we can create a testcase for our network calls using android InstrumentationTestCase I'm gonna use CoutDownLatch simply becausein most of our app we make network call on background thread. CountDownLatch gives as option to run call single threaded.

So lets get started. :-)


Step 1: Create a class NetworkCallTest extends InstrumentationTestCase within your 'app/src/androidTest/java/<package_name>


Step2: Create any method within the class prefixed as test e.g: testNetworkCall. For serial exceution you can have name as test1,test2,test3 and so on.

Note: test case are event driven if methods are not prefixed with test its not gonna execute.
public void testNetworkCall(){}


Step3: Lets create  a dummy network call for demo using aquery and countdown latch.
public class NetworkCallTest extends InstrumentationTestCase {

    @Override
    public void setUp() throws Exception {
        super.setUp();
    }

    public void testNetworkCall(){
        CountDownLatch countDownLatch = new CountDownLatch(1);
        new Thread(new NetworkRunnable(countDownLatch)).start();
    }

    private class NetworkRunnable implements Runnable {

        private CountDownLatch countDownLatch;

        public NetworkRunnable(CountDownLatch countDownLatch) {
            this.countDownLatch = countDownLatch;
        }

        @Override
        public void run() {

            AQuery aQuery = new AQuery(getInstrumentation().getContext());
            aQuery.ajax( "http://jsonplaceholder.typicode.com/posts" , JSONArray.class , new AjaxCallback<JSONArray>(){
                @Override
                public void callback(String url, JSONArray jsonArray, AjaxStatus status) {

                    assertNotNull("response array  is null", jsonArray);

                    for (int i = 0; i < jsonArray.length(); i++) {

                        JSONObject object = jsonArray.optJSONObject(i);

                        assertNotNull("jsonObject is null", object);

                        String userId = object.optString("userId");
                        assertTrue("User Id is empty" , !TextUtils.isEmpty(userId));

                        String id = object.optString("id");
                        assertTrue("Id is empty" , !TextUtils.isEmpty(id));

                        String title = object.optString("title");
                        assertTrue("title is empty" , !TextUtils.isEmpty(title));

                        String body = object.optString("body");
                        assertTrue("body is empty" , !TextUtils.isEmpty(body));
                    }

                    countDownLatch.countDown();


                }
            });
        }
    }
}


Step4:Run the test case . Click to know HOW TO RUN TESTCASES ?.